


Getting Started
- 1.
Integrate SDK:
Below are some easy steps to integrate App42 SDKs for iOS: - (a)Download the latest SDK from here
- (b)Unzip the downloaded SDK and navigate to the latest version folder as shown below:
-
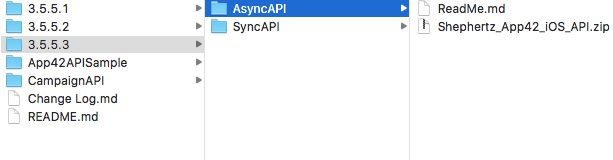
- (c)Unzip Shephertz_App42_iOS_API.zip file and drag the framework file to your project in Xcode in Project Navigator(CMD+1). Make sure “Copy items if needed” check-box is checked when prompted.
- (d)Navigate to the downloaded folder in finder and browse to CampaignAPI -> Latest Version folder as shown below:
-
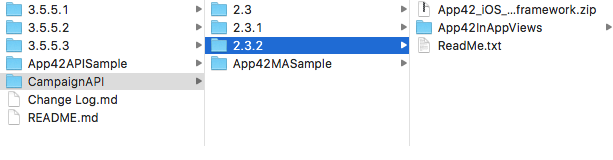
- (e)Unzip App42_iOS_CampaignAPI.zip file, drag the framework file and App42InAppViews folder to your project in Xcode in Project Navigator(CMD+1). Make sure “Copy items if needed” check-box is checked when prompted.
- (f)Add CoreTelephony.framework, SystemConfiguration.framework and CoreLocation.framework as follows: - Select your project at the top under Project Navigator
- (g)Add the following key value pair to your info.plist file
- Select TARGETS and then Build Phases
- Open Link Binary With Libraries and click on the plus(+) button
- Find above libraries from the list and click Add
NSLocationWhenInUseUsageDescription : This will be used to obtain or track your location.
You have now successfully integrated App42 MA in your project.
- 2.
Initialise SDK:
To start using App42MA, you first need to initialise the SDKs integrated above. SDK initialisation needs App42API’s API_Key and Secret_Key which you can get from here <Provide link to dashboard settings>. Once you have the keys with you then open your AppDelegate.m class and do the following: - (a)Import App42APIs as follows:
#import <Shephertz_App42_iOS_API/Shephertz_App42_iOS_API.h>
- (b)Add the following code in didFinishLaunching method:
[App42API initializeWithAPIKey:@"<YOUR_API_KEY>" andSecretKey:@"<YOUR_SECRET_KEY>"];2;
- 3.
Event Configuration:
Using App42 MA you can track App Activity as well as User Activity. There are some in-built tracking which is done by the frameworks integrated above such as App Session tracking. By default, in-built tracking are not enabled. To enable these, you need to add following code just after SDK initialisation: -
[App42API enableAppStateEventTracking:YES];
- If you do not want to enable in-built trackings but want to track only activities or events defined by you then add following code just after SDK initialisation:
-
[App42API enableEventService:YES];
- 3.1.1. Tracking App Activity: App activities are generally tracked in two parts: Start and End.
First create the object of EventService class using which all the tracking APIs will be called: -
EventService *eventService = [App42API buildEventService];
- It is always necessary to associate the activities or events tracked with a specific User so that going forward you can always analyze data with respect to a User. To do so add the following code just after the SDK initialization:
-
[App42API setLoggedInUser:@"User Name"];
- You can change the logged in User at any point of time during the App life cycle using the above method. Once you have set the logged in user name, every activity or events tracked after that will be automatically associated with that particular user.
- (a) Start Activity:
-
NSString *activityName = @"Activity Name"; NSDictionary *properties = @{@"property": @"propertyValue"}; [eventService startActivityWithName:activityName andProperties:properties completionBlock:^(BOOL success, id responseObj, App42Exception *exception) { if (success) { App42Response *response = (App42Response*)responseObj; NSLog(@"IsResponseSuccess is %d" , response.isResponseSuccess); } else { NSLog(@"Exception = %@",[exception reason]); NSLog(@"HTTP error Code = %d",[exception httpErrorCode]); NSLog(@"App Error Code = %d",[exception appErrorCode]); NSLog(@"User Info = %@",[exception userInfo]); } }]; - (b) End Activity:
-
NSString *activityName = @"Activity Name"; NSDictionary *properties = @{@"property": @"propertyValue"}; [eventService endActivityWithName:activityName andProperties:properties completionBlock:^(BOOL success, id responseObj, App42Exception *exception) { if (success) { App42Response *response = (App42Response*)responseObj; NSLog(@"IsResponseSuccess is %d" , response.isResponseSuccess); } else { NSLog(@"Exception = %@",[exception reason]); NSLog(@"HTTP error Code = %d",[exception httpErrorCode]); NSLog(@"App Error Code = %d",[exception appErrorCode]); NSLog(@"User Info = %@",[exception userInfo]); } }]; - 3.1.2. Tracking Events
-
// Event name which is to be tracked
NSString *eventName = @"Event Name";

// Properties which you want to associate with this event
NSDictionary *properties = @{@"property": @"propertyValue"};
[eventService trackEventWithName:eventName andProperties:properties completionBlock:^(BOOL success, id responseObj, App42Exception *exception) {
       if (success)
       {
           App42Response *response = (App42Response*)responseObj;
           NSLog(@"IsResponseSuccess is %d" , response.isResponseSuccess);
       }
       else
       {
           NSLog(@"Exception = %@",[exception reason]);
           NSLog(@"HTTP error Code = %d",[exception httpErrorCode]);
           NSLog(@"App Error Code = %d",[exception appErrorCode]);
           NSLog(@"User Info = %@",[exception userInfo]);
       }
   }];
- 4.
Property Configuration :
You can associate related properties along with activities, events or with logged in Users. We have divided the properties in 3 different types based on the source as follows: - 4.1. Super Properties: These properties are basically related the platform from which the event are triggered such as OS, OS Version, Carrier, Brand Model etc. These are automatically extracted by the SDK and added to the event request before sending it to server.
- 4.2. Event Properties: These can be event related meta informations which is passed along with the event as follows:
-
[eventService trackEventWithName:eventName andProperties:properties completionBlock:^(BOOL success, id responseObj, App42Exception *exception) { if (success) { App42Response *response = (App42Response*)responseObj; NSLog(@"IsResponseSuccess is %d" , response.isResponseSuccess); } else { NSLog(@"Exception = %@",[exception reason]); NSLog(@"HTTP error Code = %d",[exception httpErrorCode]); NSLog(@"App Error Code = %d",[exception appErrorCode]); NSLog(@"User Info = %@",[exception userInfo]); } }]; - 4.3 User Properties: Any kind of information which you want to associate with a User, can be saved as user properties. It can be used in Email, SMS or Push personalisation or can help you in uniquely segmenting the group of users to target using campaigns. For example, You can segment user based on their gender, age group, location, profession where gender, age etc. can be saved user properties.
- 4.3.1. Setting User Properties: Use following API If you want to set user properties first time or you want or reset it.
- 4.3.2. Updating User Properties: You can update existing user properties as follows:
NSDictionary *properties = [NSDictionary dictionaryWithObjectsAndKeys:@"Premium",@"UserType",@"Admin",@"UserRole", nil]; [App42API initializeWithAPIKey:@"APP_KEY" andSecretKey:@"SECRET_KEY"]; EventService *eventService = [App42API buildEventService]; [eventService updateLoggedInUserProperties:properties completionBlock:^(BOOL success, id responseObj, App42Exception *exception) { if (success) { App42Response *response = (App42Response*)responseObj; NSLog(@"isResponseSuccess is %d" , response.isResponseSuccess); } else { NSLog(@"Exception = %@",[exception reason]); NSLog(@"HTTP error Code = %d",[exception httpErrorCode]); NSLog(@"App Error Code = %d",[exception appErrorCode]); NSLog(@"User Info = %@",[exception userInfo]); } }];
NSDictionary *properties = [NSDictionary dictionaryWithObjectsAndKeys:@"Free",@"UserType", nil];
[App42API initializeWithAPIKey:@"APP_KEY" andSecretKey:@"SECRET_KEY"];
EventService *eventService = [App42API buildEventService];
[eventService setLoggedInUserProperties:properties completionBlock:^(BOOL success, id responseObj, App42Exception *exception)
{
   if (success)
   {
       App42Response *response = (App42Response*)responseObj;
       NSLog(@"IsResponseSuccess is %d" , response.isResponseSuccess);
   }
   else
   {
       NSLog(@"Exception = %@",[exception reason]);
       NSLog(@"HTTP error Code = %d",[exception httpErrorCode]);
       NSLog(@"App Error Code = %d",[exception appErrorCode]);
       NSLog(@"User Info = %@",[exception userInfo]);
   }
}];
- 5.
Configuring project for Push Notification:
Please use the existing tutorial for it.
- 6.
In-App Notification:
Integrating In-App Notification is very easy and simple. You have already added the App42CampaignAPI framework and App42InAppViews folders in step-1e to your Xcode project. - 6.1. Import statements: Add following import statements in the view controller class where you want to integrate In-App Notification:
-
#import
#import #import "InAppListener.h" - 6.2. Initialise Campaign API: Initialise the campaign API as follows:
-
InAppListener *inAppListener = [[InAppListener alloc] initWithViewController:self];
[App42CampaignAPI initWithListener:inAppListener];